
Although WordPress is very secure, it can be subject to vulnerabilities just like anything else. Hackers can try to exploit these weaknesses to distribute malware and steal sensitive data. If a site’s server isn’t configured properly, or the custom code and plugins used aren’t well-maintained, they’re more likely to gain access to the website.
There are various ways to secure a website and prevent online attacks. It starts simple, with choosing a secure hosting provider like Pressable and regularly updating software. But agencies and developers will also want to consider more advanced measures like implementing security headers and disabling PHP reports.
In this post, we’ll look at 28 steps to secure a WordPress site. We’ll also introduce you to an incredible program, just for agencies, that makes for happier clients and higher profits.
We’ve organized the checklist into six categories:
- Hosting environment
- User authentication and access
- WordPress core security
- Plugins and themes
- Advanced WordPress hardening
- Additional checklist items for WordPress agencies
Let’s get to it!
Hosting environment
To kickstart this WordPress security checklist, let’s first take a look at some key measures to secure your hosting environment.
1. Choose a secure hosting provider
Web hosts store your site and make your content publicly accessible. Therefore, you’ll want to choose companies that take preventative measures to protect your server from cyber threats.
For instance, they should provide web application firewalls (WAFs) and network monitoring. Some providers also offer malware detection or distributed denial of service (DDoS) protection.
You’ll also want to prioritize companies that include regular backups in their plans. This way, if something does go wrong, you’ll have a recent copy of the site that you can restore.
WordPress.com offers essential security features including real-time backups, malware scanning, DDoS and WAF protection, and more.
It also gives you access to a staging environment, where you can carry out updates safely. Plus, you’ll get expert support.
Alternatively, Pressable offers fully-managed WordPress plans with an impressive 100 percent uptime guarantee and superior support. You’ll also get real-time backups with one-click restores, built-in two-factor authentication, DDoS and WAF protection, and more.
Both WordPress.com and Pressable are built on top of WP Cloud — Automattic’s hosting platform. This provides the ultimate environment for security, performance, and management.
2. Ensure server software is up-to-date
WordPress is predominantly built on PHP, but it also uses HTML, CSS, and JavaScript. And beyond the WordPress core software, you also have plugins and themes to think about.
As you may already know, updates come with new features and functionality. But they often include bug fixes and patches for known vulnerabilities.
Therefore, you’ll want to regularly check your site for updates. You’ll find these in Dashboard → Updates, although you’ll usually see a notification when updates are available.

It’s also a good idea to enable auto-updates, which you can do from the Plugins page.
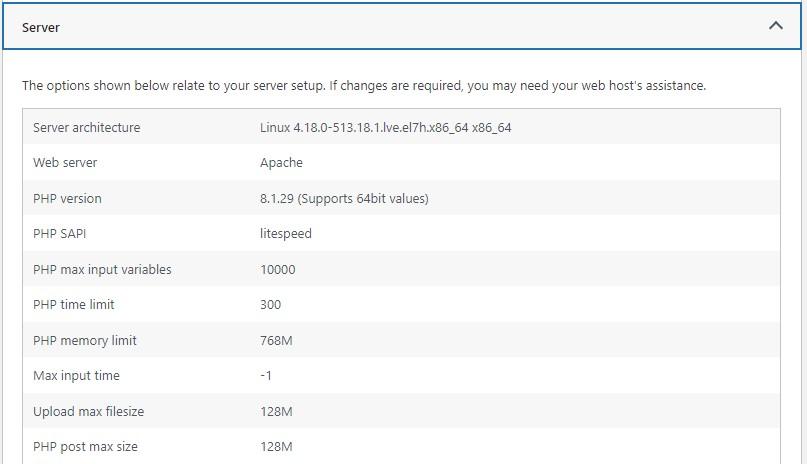
Additionally, you’ll want to make sure that you’re running the latest versions of PHP. WordPress recommends that you use PHP 7.4 or greater.
You can check this by going to Tools → Site Health. Then, switch to the Info tab and expand the Server section.
WordPress websites store information in a MySQL database. This should use version 8.0 of MySQL or later. You can check this by following the steps above but expanding the Database tab instead.
If your web host doesn’t support the latest versions, you might want to switch to a different hosting provider.
3. Ensure that SSL encryption (HTTPS) is enabled
Lots of data gets exchanged between browsers and servers, including credit card details and personal information like passwords. Malicious actors may conduct man-in-the-middle (MITM) attacks to steal this data.
You can install an SSL certificate and use a HTTPS connection to encrypt this sensitive information. The data will be replaced with random strings of numbers and letters, making it unreadable if hackers do succeed in accessing it.
Beyond security purposes, Google also favors websites that use HTTPS instead of HTTP. You’ll know if you’re using HTTPS if you open your website in a browser and see a lock icon beside the domain. The domain should also be preceded by “https” rather than “http”.
If you don’t have an SSL certificate, you’ll need to purchase one from a valid certificate authority (CA). That said, you’ll often find that many web hosting companies offer free and auto-SSL certification.
4. Disable directory indexing
Directory indexing is a server feature that plays an important role in how your website functions. If the server can’t find a file in the directory, it will either return an error or display the contents of the directory.
But this means that anyone can see what’s inside your directory, which makes it easier for malicious users to access sensitive information like personal details or configuration files. Therefore, it’s best to disable directory indexing to safeguard this data.
Most WordPress sites are set up with an Apache configuration. In this instance, you’ll need to access the .htaccess file via SFTP. Once inside the file, add the line: Options -Indexes to stop the server from listing your directory contents.
User authentication and access
Next in this WordPress security checklist, we’ll explore key measures that involve user authentication and access.
5. Enforce strong username and password policies
It’s very important to use and enforce strong passwords across your site. They should contain a mix of uppercase and lowercase letters, numbers, and special characters.
Even then, passwords can still be cracked instantly if they’re fewer than seven characters. Therefore, it’s best to prioritize long passwords. But, you also need to ensure that every user on your site sets strong passwords and usernames.
You’ll find that many general-purpose security plugins come with the ability to define a minimum password strength. There are also dedicated solutions including Password Policy Manager.
If you have a multi-author site, it can be useful to educate contributors about password security.
6. Require 2FA for all user accounts
Even with strong usernames and passwords, your website can still be susceptible to a brute- force attack. This occurs when hackers guess different combinations of credentials until they gain unauthorized access to your site.
Therefore, you’ll need to add a layer of security to the login process. With two-factor authentication, users have to supply extra verification (besides a password).
Usually, this is a code generated in real time and sent to the user’s mobile device or email. Some companies also use authenticator apps.
7. Implement role-based access control
Role-based access control is a key part of any good WordPress security checklist. It enables you to provide different users with different privileges, reducing the number of people who have more (or full) control over a site.
WordPress comes with a handful of default user roles including subscribers, authors, editors, and administrators.

You’ll also find that some plugins create additional roles. For example, if you use WooCommerce, you’ll have new roles like customers and store managers.
Every role corresponds to a different set of permissions. A subscriber has the fewest permissions. All they’re able to do is edit their own profiles, read posts, and leave comments.
At the other end of the spectrum is the administrator role. This grants full access to the site.
As a general rule of thumb, there should only be one admin per site. This way, even if a hacker manages to crack a user’s password and access a site, the damage can be contained.
If a hacker gets hold of an admin account, they could wreak havoc on your site. But if they break into a subscriber account, there isn’t much damage they could do.
Administrators for a site can change user roles by going to Users → All Users. Then, clicking on a specific user account and scrolling down to the Roles section. Here, the administrator should check the box beside the roles to modify access.
8. Review and remove inactive user accounts
If you have loads of user accounts on a site, it gives hackers more opportunities to break into it. Therefore, it’s good practice to regularly review user accounts in the WordPress dashboard.
If you find old accounts from previous employees or contributors, it’s best to delete them. You might also like to remove inactive accounts with suspicious activity.
The way to identify inactive accounts depends on the website type and size. For instance, if you manage an ecommerce site, it might seem strange if a user sets up an account but never purchases a product.
9. Limit the number of login attempts
As mentioned earlier, brute force attacks occur when hackers trial hundreds of password and username combinations until they gain access. A great way to reduce the potential harm from these attacks is to limit the number of login attempts.
For instance, users may get three chances to log into their accounts successfully. After that, they’ll have to wait 15 minutes before they can try again.
There are several WordPress security plugins that provide this functionality. For instance, Limit Login Attempts Reloaded comes with customizable lockout times and lockout email notifications.
WordPress core security
Next up, let’s take a look at some essential steps to secure WordPress core software.
10. Ensure that WordPress core is up to date
Earlier, we talked about the importance of keeping software up-to-date to make it more resilient to security threats. New software tends to be less susceptible to hacks, partly because it’s just been released so hackers haven’t identified backdoors and vulnerabilities yet.
Additionally, many updates come with security enhancements. For example, WordPress 6.6.1 featured seven bug fixes in WordPress core and nine in the block editor.
If you’re not sure whether you’re running the latest version of WordPress, go to Tools → Site Health → Info and expand the WordPress tab.

Or, you can head to Dashboard → Updates to see if a new version of WordPress is available to install. If there is, it’s important to take some precautions to update your site safely.
First off, you’ll want to make a fresh backup. That way, if you encounter an error, you can restore an up-to-date version of your site. Additionally, it’s a good idea to test the update in a staging environment before you deploy it on your live site.
11. Change the default “admin” username
Another great way to secure your WordPress site is to choose a custom name for your WordPress admin account. By default, WordPress sets “admin” as the username. But this makes it easier for hackers to access your site since they only have to guess the password.
To do this, you’ll have to access the WordPress database via cPanel. Here, locate the wp_users table and find your admin username on the list. Click on the Edit button and insert new values where “admin” is displayed.
At the very least, you’ll need to change the user_login field to change the username. But it’s also best to edit the user_nicename and display_name. When you’re done, remember to save the changes before exiting phpMyAdmin.
12. Change the default database prefix
The WordPress database is a prime target for hackers since it contains every piece of information about your site. Plus, WordPress uses the default “wp_” database prefix which makes it easier for hackers to launch mass attacks.
The good news is that you can change the prefix. To do this, connect to your site using SFTP and open the wp-config.php file. Look out for the line that reads: $table_prefix = “wp_”;
You can change this value to anything you want or you might simply follow up the default prefix with additional letters or numbers. Next, you’ll need to access phpMyAdmin via your cPanel dashboard.
Here, the goal is to change the prefix of the default WordPress tables, but doing this manually takes some time. Click on the SQL tab at the top, then enter the following SQL query:
RENAME table `wp_commentmeta` TO `wp_a123456_commentmeta`;

RENAME table `wp_comments` TO `wp_a123456_comments`;

RENAME table `wp_links` TO `wp_a123456_links`;

RENAME table `wp_options` TO `wp_a123456_options`;

RENAME table `wp_postmeta` TO `wp_a123456_postmeta`;

RENAME table `wp_posts` TO `wp_a123456_posts`;

RENAME table `wp_terms` TO `wp_a123456_terms`;

RENAME table `wp_termmeta` TO `wp_a123456_termmeta`;

RENAME table `wp_term_relationships` TO `wp_a123456_term_relationships`;

RENAME table `wp_term_taxonomy` TO `wp_a123456_term_taxonomy`;

RENAME table `wp_usermeta` TO `wp_a123456_usermeta`;

RENAME table `wp_users` TO `wp_a123456_users`;
Remember to change the prefix to the new one you applied in the wp-config.php file.
13. Change the default /wp-admin and /wp-login.php URLs
Another potential WordPress vulnerability is that it labels the login pages the same for every website. Usually, it’s your domain followed by either “wp-login” or “wp-admin”. This makes it easy for hackers to find your login page and try to access your site.
Therefore, you can improve WordPress security by choosing a custom login URL that’s hidden from untrusted sources. To do this, you can use a free plugin like WPS Hide Login.
But if you don’t want to rely on a plugin, you’ll need to access the wp-login.php file via SFTP.
It’s best to download a copy of this file to your computer and use a text editor with a search-and-replace function to identify every instance of “wp-login.php”. Then, you can change this value to your desired login URL.
Save the changes and rename the file to whatever you’ve chosen as your desired login URL. Then, you can upload the file back to the WordPress root directory using SFTP.
14. Disable file editing to prevent malicious changes
By default, WordPress gives admin users access to plugin file editors and theme file editors. This poses a huge problem if hackers manage to gain access to your account where they might modify theme and plugin files, or inject malicious code into your site.
To disable file editing in the WordPress dashboard, you’ll need to connect to your site using SFTP and open the wp-config.php file. Above the final line of the file, add the following code:
define(‘DISALLOW_FILE_EDIT’,true);Make sure to save the file. Then, log into the WordPress dashboard and check to see if it worked. Go to Appearance → Editor and Plugins → Editor. These tools shouldn’t be available anymore, even with the admin account.
15. Disable WordPress version disclosure
Leaving your WordPress version number visible can make your site an easier target for hackers. It enables them to exploit vulnerabilities associated with your specific version of WordPress.
Although it’s difficult to remove all traces of your WordPress version, you can certainly hide it from automated scanners and less sophisticated attacks. To do this, you’ll need to access your File Manager, available through cPanel.
Or, you can connect to your site files using FTP. Open the root directory of your website and access the wp-content folder. Then, open the themes directory and find the functions.php file.
Now, add the following code to the bottom of the file:
remove_action(‘wp_head’, ‘wp-_generator’)Remember to save your changes.
16. Disable PHP error reporting
PHP errors that display on your site are often warnings or notices that are helpful for developers trying to debug issues. But displaying them on the front end of your site can look unprofessional and make it easier for hackers to discover vulnerabilities.
Therefore, it’s best to disable PHP error reporting. Again, you’ll need to access your site files and open the wp-config.php file. Here, add the following line:
define(‘WP_DEBUG’, true);Then, save your changes and upload the file back to the server.
17. Ensure that security headers are implemented
HTTP security headers enable your server to prevent certain security threats before they can impact your website. They protect against common threats like cross-site scripting, brute force attacks, and click-jacking.
Here are some of the most important security headers to implement:
- Strict-Transport-Security (HSTS), which tells browsers that your site shouldn’t be loaded using insecure protocols like HTTP.
- Content-Security-Policy (CSP), which adds protection against click-jacking, XSS, and code injections.
- X-Frame-Options, which prevents click-jacking.
- X-Content-Type-Options, which allows you to avoid MIME-type sniffing.
Certain security plugins may provide ways to implement security headers. But you can do this manually using the .htaccess file.
Here is a good example of the type of code to use with optimal settings:
<ifModule mod_headers.c>

Header set Strict-Transport-Security "max-age=31536000" env=HTTPS

Header set Content-Security-Policy default-src 'none'; script-src 'self'; connect-src 'self'; img-src 'self'; style-src 'self';

Header set X-Frame-Options DENY

Header set X-Content-Type-Options nosniff

</ifModule>
Make sure to save the changes and upload the file back to the server.
Plugins and themes
WordPress sites are made up of three main types of software: core, plugins, and themes. In this section, we’ll discuss three ways to secure your plugins and themes.
18. Verify the reliability of installed plugins and themes
Ideally, you’ll want to verify the reliability of plugins and themes before you install them on your site. You can do this by reading the customer ratings and reviews, checking the support forum to gauge the level of support available, and seeing how often the software is updated.
Generally, it’s a good idea to stick to well-known providers that are highly regarded across the WordPress community. That said, you might want to check the plugins and themes that you’ve already installed.
19. Update plugins and themes to their latest version
Themes and plugins get updated often to keep up with the latest trends and developments. Many updates also come with performance enhancements and security fixes.
Although you’ll usually receive notifications in the dashboard, you can manually check whether updates are available by going to Dashboard → Updates.
Here, you’ll find a list of plugins and themes that have new versions available. Simply check the box beside the ones you’re ready to update and click on the Update Plugins or Update Themes button.
We also mentioned the possibility of enabling auto-updates. This means that no manual action is required, so it’s great if you’re worried about remembering to update software (or if you don’t regularly log into the dashboard).
20. Remove and disable unused themes and plugins
Every piece of software that you install puts your site at greater risk of hacking attempts. It also increases the amount of maintenance, since you need to regularly check and run updates to keep software secure.
Therefore, it’s good to get into the habit of auditing plugins and themes on your site. You only need one theme, although it can be a good idea to keep a default theme installed for troubleshooting purposes.
In terms of plugins, you don’t need more than one plugin for the same functionality (like two SEO plugins). Plus, there are plenty of plugins that offer a one-time service, like migrations, that you can remove later.
If you find lots of plugins and themes you don’t need, you can go ahead and deactivate or delete them entirely. You can use the Bulk actions dropdown if there are a lot of them.
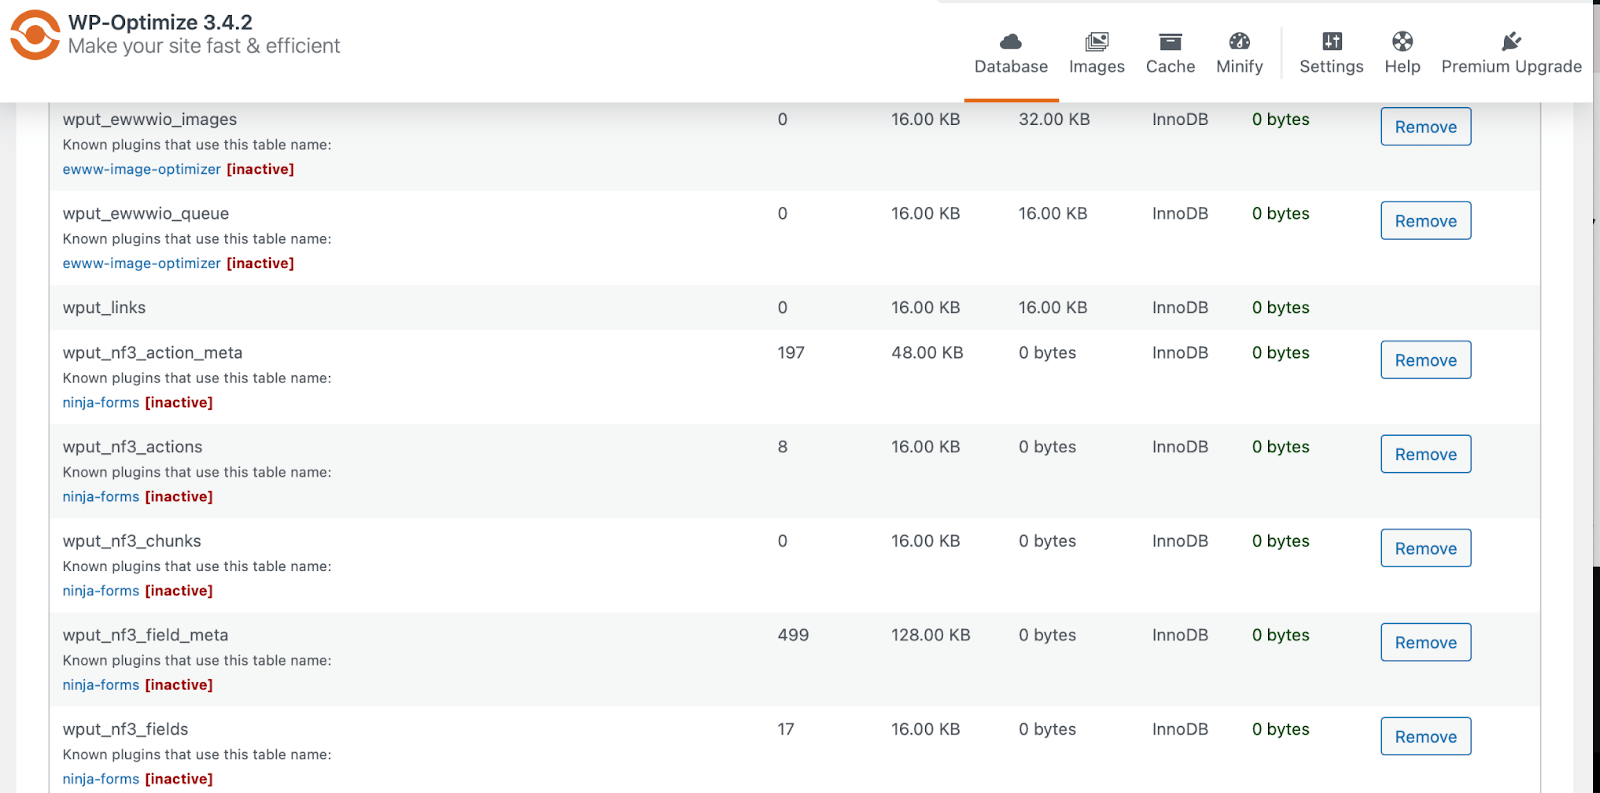
Some plugins leave behind tables in the WordPress database even when you delete them from the dashboard. You can use a plugin like WP-Optimize to delete these tables.
Simply go to WP-Optimize → Database → Tables. If you see tables marked as “not installed” or “inactive”, go ahead and click on the Remove button.
If you don’t want to use a plugin, you can do this manually, but you’ll need access to the site’s hosting account.
Once you log into cPanel, open phpMyAdmin and locate the WordPress database. Then, look through the list of tables and delete those you no longer need. You’ll use the Drop button to do this, and you’ll see a success message once the process is complete.
Advanced WordPress hardening
Let’s finish this WordPress security checklist by looking at some advanced hardening steps.
21. Install a reputable security plugin
With an all-purpose security plugin, you’ll get access to a range of security features including real-time backups, a web application firewall, malware scans, and more.
Jetpack Security is a robust solution that offers a range of free and paid packages.
You can use the tool to conduct real-time backups that are stored in the cloud (so they don’t take up storage space and aren’t compromised by an issue with your host). It also features one-click restores that facilitate a quick and easy recovery process.
You’ll also get a 30-day activity log, so you can see which actions (or users) have caused issues on your site. Plus, Jetpack provides a web application firewall, brute force attack protection, downtime monitoring, malware scanning, spam protection, and more.
22. Install a web application firewall (WAF)
A web application firewall (WAF) is a preventative security measure that blocks suspicious traffic from reaching your site. It sits at the boundary of your website and filters IP addresses, stopping any that it deems malicious.
Jetpack Security provides its own WAF with configurable rules. This means that you can allow and block specific IP addresses.
23. Ensure a malware and vulnerability scanner is installed
Malware refers to malicious software that can take the form of viruses, worms, and trojans. What makes malware particularly problematic is that it’s notoriously difficult to detect.
It’s often used to steal sensitive data or destroy computer systems. And some types of malware get triggered by legitimate user interactions.
You’ll often find links added to blog comments that redirect to malware. It may also be injected into your WordPress database so that it remains undetected for longer.
Common signs of malware include your website running slower than usual or crashing regularly. You might be seeing lots of ads that you didn’t put there.
As well as being difficult to detect, malware is challenging to remove. Therefore, it’s a good idea to take precautionary measures to detect malware before it poses a serious problem for your site.
As we’ve discussed, WPScan can detect vulnerabilities on your site. Meanwhile, Jetpack Security is a full-purpose security plugin that provides real-time malware scanning. Plus, you can regularly back up your site with this tool, which makes it easy to recover your site following a malware infection.
24. Use a CDN to protect against DDoS attacks
A content delivery network (CDN) is primarily used by website owners to speed up content delivery times. Essentially, a CDN gives you access to a network of servers that are strategically distributed to reduce latency.
That said, CDNs can also stabilize your website and protect against distributed denial of service (DDoS) attacks. These attacks are carried out by flooding your website with thousands of fake requests.
CDNs can mitigate these attacks because they’re designed to handle traffic spikes. In these instances, the CDN can redistribute traffic, making sure that it doesn’t reach the origin server and take down your site.
25. Prefer SFTP over FTP for file transfers
If you want to manage or edit files on your web server, one of the simplest solutions is to use a secure file transfer protocol (SFTP) client. This is a more secure version of FTP. Rather than forming a direct connection, it leverages tunneling to carry out file transfers over SSH (secure shell).
SFTP only uses a single secure channel to transfer files, and the data that moves between the client and the server is encrypted. This reduces the risk of man-in-the-middle attacks since even if someone intercepts the data, it remains unreadable.
26. Set up automated backups for fast disaster recovery
We’ve mentioned the importance of backups multiple times throughout this article. Essentially, a backup is an up-to-date copy of your website posts, pages, products, theme settings, database, and more.
This can come in handy if you ever make a serious error on your site. But it also simplifies the recovery process if your website gets hacked or certain site files get infected. In these instances, you can simply replace it with a clean copy that you made earlier.
While you can back up your site manually, it’s much easier to automate the process using tools like Jetpack VaultPress Backup.
What’s great about this tool is that it stores backups in the cloud to reduce the load on your server. You’ll also get instant recoveries thanks to one-click restores.
Jetpack VaultPress is also a good option for ecommerce sites, since it backs up all WooCommerce customer and order data.
27. Make sure backups are stored on a separate server
Storing backups in a remote location (meaning, not on your server) will reduce load and maintain performance. But it’s also useful for security reasons.
If you store your backups on your server, then they’ll also be at risk if your server gets attacked. Therefore, you’ll want to store them on a separate server.
Cloud solutions tend to work best for security purposes. Plus, your backups will be easily accessible when you need them.
28. Set up activity logging and monitoring
Troubleshooting security issues and errors can be a lengthy process. To resolve them, you’ll first have to identify the cause, which isn’t always easy.
That’s why it’s a good idea to set up an activity log. This way, you can quickly spot the action or user that caused the problem. As we’ve discussed, Jetpack Security provides a 30-day activity log.
For every event, you’ll see the time, user, and a brief description of what occurred. You can also filter activities by type and time to find information faster. And if you upgrade to the Complete plan, you can view events from the past year.
Additional checklist items for WordPress agencies
Although we’ve provided an extensive WordPress security checklist, there are some additional considerations for WordPress agencies. Let’s take a look at what they are.
Educate your clients on WordPress security
If your clients understand the importance of WordPress website security, they’ll be more likely to follow best practices. Therefore, you should make sure that clients know the consequences of security breaches including loss of traffic, revenue, and reputation damage.
It’s also a good idea to ensure that clients understand the requirements for collecting and storing customer data. Otherwise, if security breaches result in the loss or theft of sensitive data, they might face hefty financial penalties.
You can discuss security best practices with clients directly, but you can also provide resources that you can easily share with other team members. Additionally, point them to other sites or blogs where they can educate themselves further.
Conduct regular security reviews and audits
As we’ve seen, there are many things that make your site more susceptible to security risks. This includes outdated software, unreliable hosting, spam comments, and more.
Therefore, it’s important to regularly review or audit client websites. You can do this manually, but it’s likely to take a while and be less accurate. Or, you can install an automated security scanner that picks up on known vulnerabilities and helps you fix them before they cause serious damage.
Use version control systems to track changes
It’s a great idea to implement systems that monitor websites and track user activity. This way, you can gain valuable insight into user behavior, spot suspicious tendencies, and detect unauthorized access attempts.
For example, you can monitor post updates, plugin installations, theme changes, and more. Not only can you see these changes, but some solutions enable you to roll back or undo the action to restore your site to its original state.
There are various version control systems available for WordPress sites, but the best option depends on your technical experience. Git is a more advanced option while Bedrock is slightly easier to learn.
Set up monitoring systems to detect unusual activity
Besides version control monitoring, you can also set up systems that are dedicated to rooting out suspicious user activity. A great example of this is a web application firewall (WAF) which detects suspicious IP addresses.
Or, as we discussed earlier, you can find solutions that notify you of repeat login attempts which might be a sign of a brute-force attack. But, you can also keep a more general eye on your website by installing an activity log.
With Jetpack Security, you’ll get a 30-day activity log which reveals the most recent 20 events on your site. It includes information about when and who carried out the action. This also takes the guesswork out of repairing your site following WordPress errors.
Use secure staging environments for development and testing
A staging environment is an exact replica of your website that isn’t accessible to the public. It’s a safe place to test out new features, learn the WordPress platform, or carry out website redesigns in private.
Many quality web hosting providers offer free staging sites with their hosting packages. If your host doesn’t, you can set up your own staging environment using tools like WP Staging.
Prioritize secure plugins and solutions for client websites
As you’re probably aware, there are tons of plugins and themes available for WordPress sites, including options that you can purchase from third-party providers.
The problem is that not all plugins are built on quality code. Plus, they might lack compatibility with other essential tools, or come with limited support, which means you’re stuck if you run into issues. Therefore, it’s best to stick to reputable sources for client websites.
A good indicator of quality is a large number of active installations. Beyond that, you can have a thorough read of customer reviews and documentation. And, it’s a good idea to check what support is available (or see how active the developer is in support forums).
Why the best WordPress agencies pick Automattic for Agencies
If you serve a range of clients using the WordPress platform, there’s no better move than to become an Automattic partner. You’ll get access to exclusive discounts on the industry’s best tools, commissions on referrals to proven products your clients will love, and premium support that’ll make you the hero.

Throughout this WordPress security checklist, we’ve mentioned specific companies, like Pressable and WordPress.com, for secure web hosting. And we’ve discussed various Jetpack products, including the all-in-one security plan for backups, malware scans, and more.
When you become an Automattic partner, you’ll get access to lots of useful services, including the ones mentioned above. You can earn up to a 50 percent commission on the sale of Woo-owned extensions, Jetpack products, and WordPress.com or Pressable hosting plans (plus bonuses for migrations). Plus, you’ll gain access to discounted pricing on other Automattic-owned products (up to 80%).
You can even share your client’s success with a bonus based on transaction volume processed through WooPayments.
You’ll also get access to an intuitive centralized billing system, which makes it easy to manage all your client sites and licenses from one dashboard. And with dedicated support for all Automattic products, you’ll enjoy quick resolutions to any problems.
Frequently asked questions
Although we’ve covered all essential information in our WordPress security checklist, you may still have some questions. In this section, we’ll answer the most common ones.
What are the most common WordPress security vulnerabilities?
Malware is a common WordPress security vulnerability because it can be used to execute a range of other attacks, and it’s very difficult to detect (and remove). That said, outdated software makes WordPress more susceptible to security problems. And, since WordPress uses default login URLs and admin usernames, it can be a prime target for brute-force attacks.
How can I detect security vulnerabilities on a WordPress site?
The easiest way to detect security vulnerabilities on WordPress is to install an automated scanner. This picks up on problems with WordPress core, as well as plugins and themes. You can also install an all-purpose security plugin like Jetpack Security, which provides real-time malware scanning.
How can I know if a hosting provider is reliable and secure?
Typically, it’s best to stick to well-known hosting providers like WordPress.com and Pressable. That said, you can find out if a web host offers a secure service by seeing what features are available, checking reviews, and considering their presence and contributions to the WordPress community.
Quality solutions provide regular backups and automatic updates. Plus, you can find services that offer more advanced protection including DDoS protection and web application firewalls.
What should I do if a WordPress site gets hacked?
If you’re managing a WordPress site that’s hacked, the best first step is to restore a backup to before the hack took place. If you’re using a tool like Jetpack VaultPress Backup, you can use the activity log to identify suspicious behavior and restore to immediately before it occurred.
Then, perform a full malware scan and remove anything that’s found. You’ll also need to reset all passwords and remove any unapproved users. For a full list, read Jetpack’s guide on what to do if your site is hacked.
Stay one step ahead with a security checklist and toolkit
While WordPress is a popular platform, there are still potential vulnerabilities that can put yours or your clients’ content, data, customers, and passwords at risk. So security is an area that you definitely want to prioritize.
This is especially true for WordPress agencies with lots of clients. What’s the best way to tackle this? Becoming an Automattic partner, and protecting all of your client sites with the best available tools while bolstering your income and streamlining operations.
Automattic for Agencies gives you access to premium support and best-in-class products to secure client websites. This includes secure hosting from Pressable and WordPress.com, as well as vulnerability scans and more from Jetpack. Join Automattic for Agencies today!
